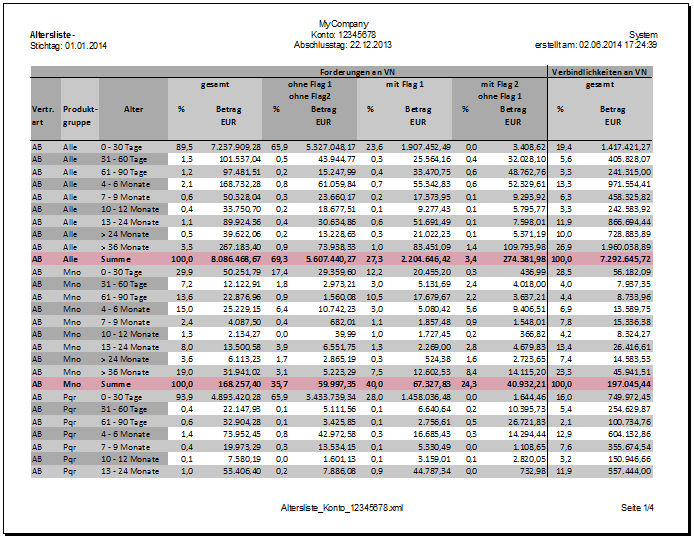
This is an example for a report where different technics are combined. I only describe the most important parts. You can download the script and the result here ![]() altersliste.zip
altersliste.zip
Whenever you write code it is important to think about how to organize it before you start.
Styles
The number of styles in a worksheet can increase very quickly, even when you combine only a small number of features.
Here we need 8 for the captions alone and another 18 for the different number/text/sum fields.
To keep track of your variables the naming should follow a pattern. In this case c_stilFettHdgRru means bold font (Fett) - dark gray background (Hintergrund dunkelgrau) - border left and bottom (Rand rechts unten)
    --Fett,Hintergrund dunkelgrau, Rand rechts und unten
    c_stilFettHdgRru        CONSTANT VARCHAR2 (5) := 's50';
The definition of the styles is done in a procedure, the respectiv variable to keep the definitions is defined globally. Of course you also can use a function and define the variable in the main procedure.
    tab_customStyles        xml_spreadsheet.t_tab_customStyles;
   ...
   PROCEDURE declareCustomStyles
   IS
First I generate the auxiliary variables for repeatingly used format elements, e.g. the text is always top aligned and linefeed is allowed or borders are always black with line width 1.
      r_alignmentC.vertical := 'Top';
      r_alignmentC.wrapText := TRUE;
      r_alignmentC.horizontal := 'Center';
...
      tab_borderO(1)    := r_border;
      r_border.bLineStyle := 'Continuous';
      r_border.bWeight  := 1;
      r_border.bColor   := '#000000';
      r_border.bPosition := 'Bottom';
Now I can use the fragments for the different styles.
      --dunkelgrau fett Rand rechts und unten
      r_customStyles.id := c_stilFettHdgRru;
      r_customStyles.type := 'Text';
      r_customStyles.format := NULL;
      r_customStyles.alignment := r_alignmentC;
      r_customStyles.border := tab_borderRU;
      r_customStyles.background := r_backgroundDg;
      r_customStyles.font := r_fontB;
      tab_customStyles (i) := r_customStyles;
      i := i + 1;
Accordingly there are procedures to define the columns and the print layout (declareColumnsAltersliste declarePrintSetupAltersliste). After the file is created I write the headers. Please note that I don't use the built in feature. I treat them as normal rows (with special formattings), because otherwise I could not give them different colours or borders.
    tab_customStyles        xml_spreadsheet.t_tab_customStyles;
   ...
PROCEDURE anlegenDatei
IS
BEGIN

    declarePrintSetupAltersliste();
    declareColumnsAltersliste();
    declareCustomStyles();
    v_fileHandle := xml_spreadsheet.createNewFile (
                        'LISTEN_DAT',
                        'Altersliste_Konto_12345678.xml',
                        tab_customStyles);
...
    xml_spreadsheet.writeData (
        v_fileHandle,
        TO_CHAR (NULL),
        c_stilFettHdgRru,
        NULL,
        NULL,
        2);
    xml_spreadsheet.writeData (
        v_fileHandle,
        'Forderungen an VN',
        c_stilFettHdgRru,
        NULL,
        NULL,
        7);
...
The main procedure only contains the cursor. In the first iteration I open the file so I can prevent empty reports.
    FOR rec_liste IN cur_liste LOOP
        IF v_first THEN
            anlegenDatei();
            v_first := FALSE;
        END IF;

        v_styleFlag := MOD (rec_liste.altgrp_nr,  2);

        xml_spreadsheet.newDatarow (v_fileHandle);
        xml_spreadsheet.writeData (
            v_fileHandle,
            rec_liste.vta_cd,
            CASE v_styleFlag WHEN  1 THEN c_stilHhgRo
            WHEN 0 THEN c_stilHdgRo
            ELSE c_stilFettHviRo
            END
            );
...
| Excel |
|---|
 |
Click on image to enlarge |